


In this article, you will learn how to create a Next.js application integrated with Flotiq. We will describe how to conveniently fetch data using a personalized SDK, configure caching, and utilize draft mode for previewing changes. Finally, we will publish the application on the Vercel platform.
The example application code can be found on GitHub.
Prerequisites
Before diving into the article, make sure that:
- You have a Flotiq account.
- You have a Vercel account.
- You have basic knowledge of React.js, TypeScript, and Next.js.
Action Plan
In a few simple steps, we will create a real-world News page listing current news.
- Setup content types and data in Flotiq
- Setup the Next.js application
- Connect Flotiq with Next.js using a personalized SDK
- Display a list of articles and a single article
- Build a statically generated application
- Implement the On-demand revalidation mechanism
- Implement Next.js Draft Mode
- Go live! Deployment to Vercel
1. Setup Content Types in Flotiq
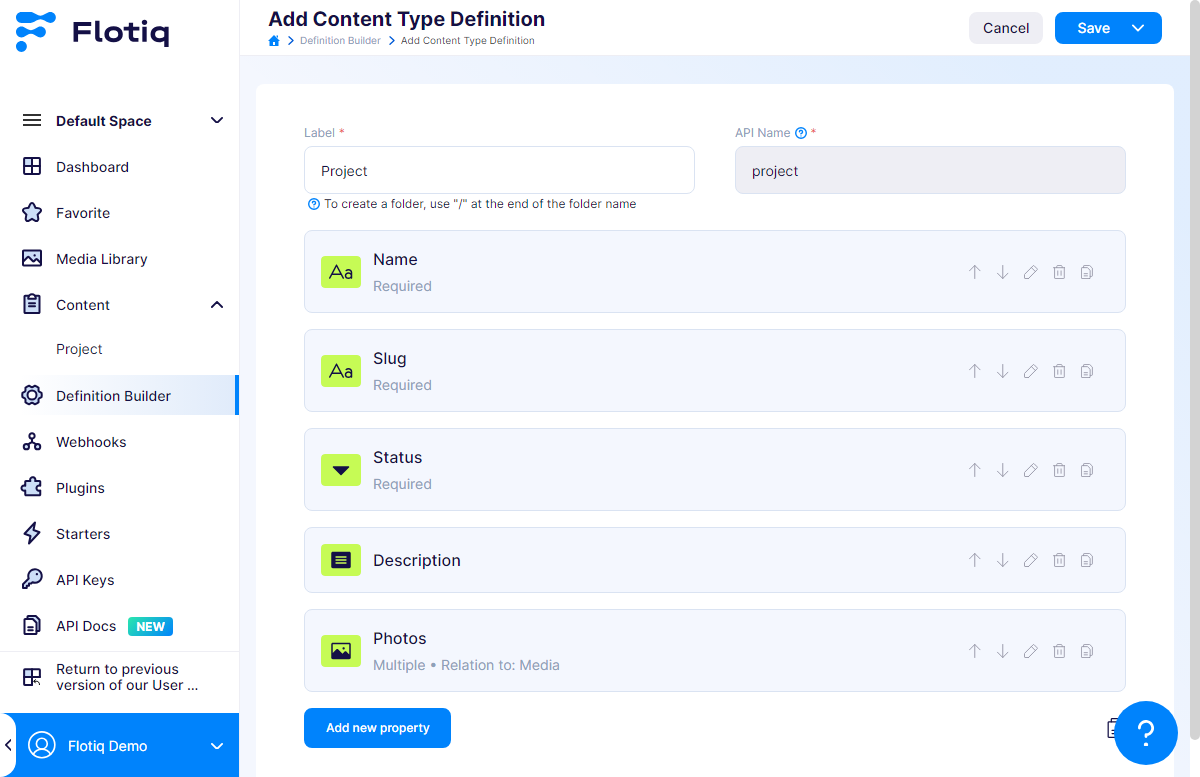
First, we need to create Content Type Definitions for our project. In the proposed example, this will be the Project data type.
1. Log in to the Flotiq panel.
2. Create a Content Type Definition corresponding to our project.
- Label: Project
- API Name: project
- Properties:
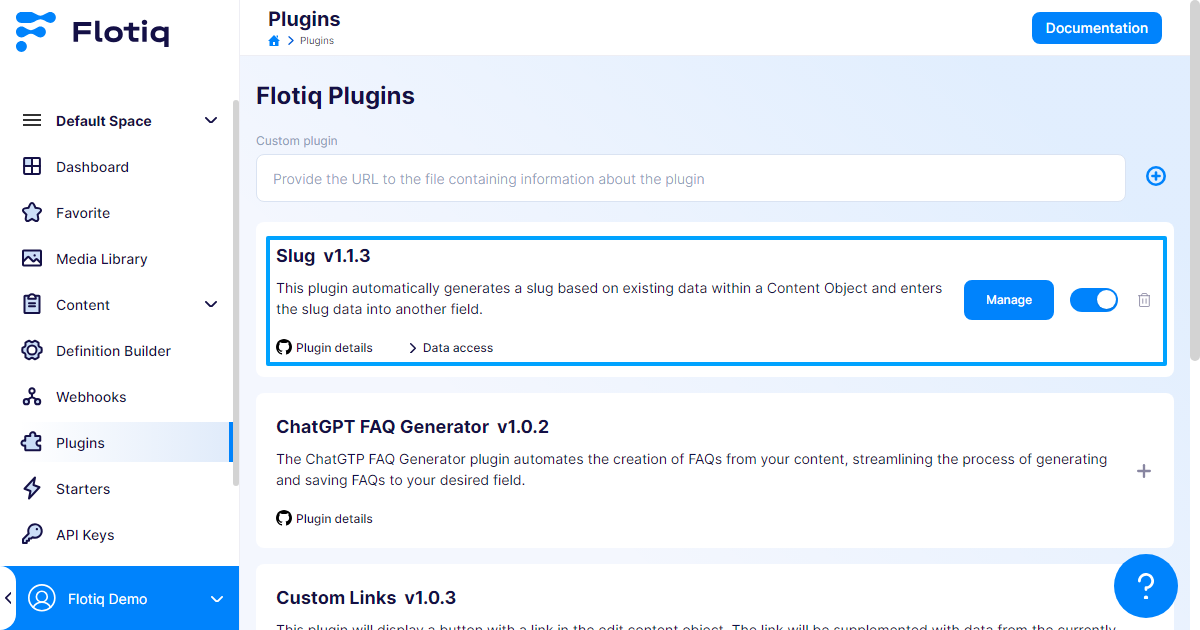
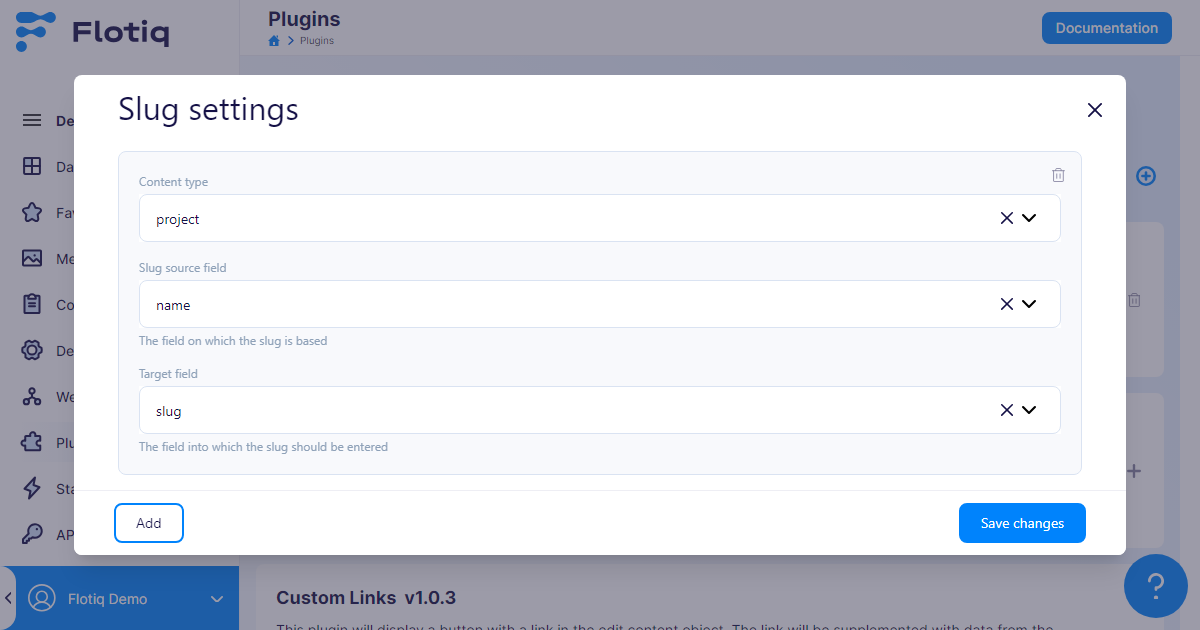
3. Use the Slug plugin, to simplify content entry. This will automatically generate a slug from a specified field.
- Go to Plugins.
- Click “+” next to the Slug plugin.
- Complete the configuration.
4. Enter sample data into Flotiq. A few sample entries will suffice:
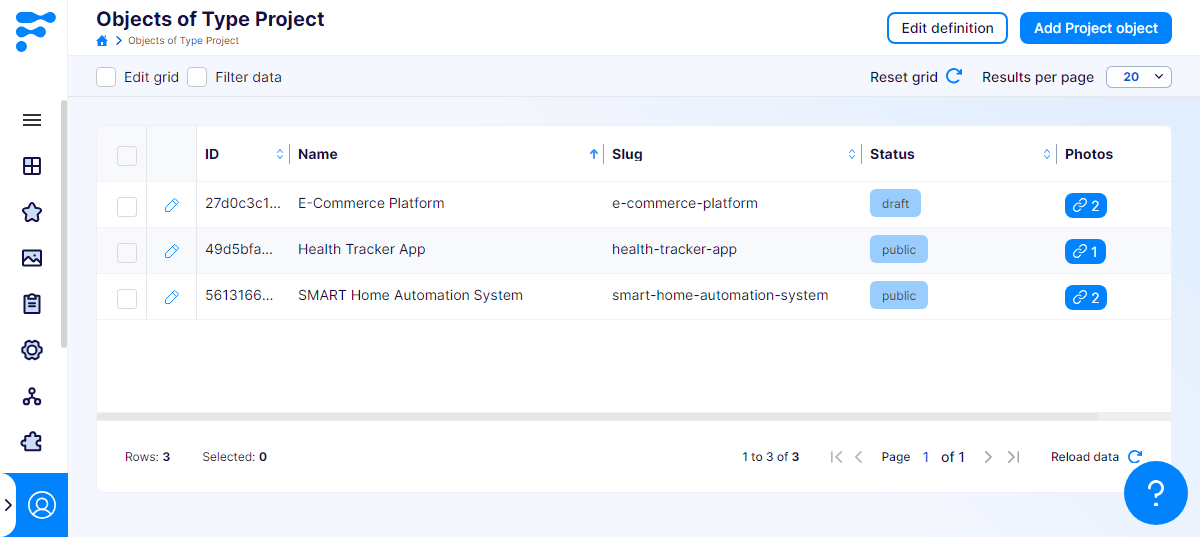
The first important step is behind us. We now know what we will store in the system and can start adding content. Now it's time to prepare the application based on your model and data.
2. Next.js application setup
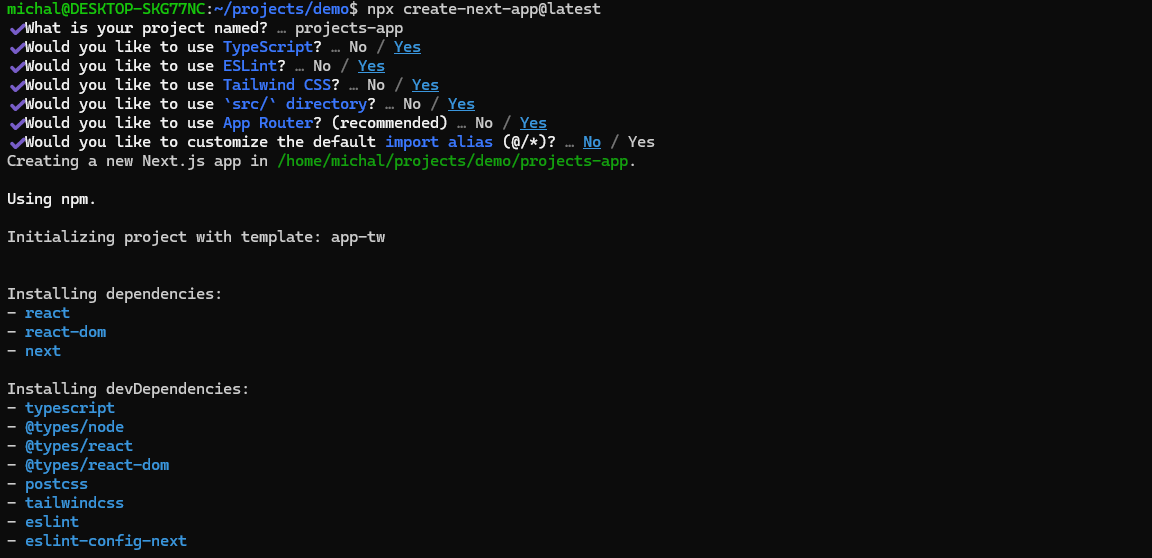
Navigate to the desired directory and run the following command to create a new Next.js application:
npx create-next-app@latestWe will create a project using the App Router, based on TypeScript, and utilizing Tailwind CSS as the CSS framework. Here is the complete configuration:
Navigate to the application directory and run the application
npm run devAt http://localhost:3000, you will see the default Next.js homepage.
Now, it's time to add content from Flotiq.
3. Connecting Flotiq with Next.js
Data from Flotiq can be fetched in various ways - using REST API or GraphQL. Regardless of the approach taken, to communicate with Flotiq, we need to save the API Key in the application, which gives access to your data in Flotiq.
The API Key is available in the Flotiq panel, under the "API Keys" tab. Copy the "Read and write API KEY".
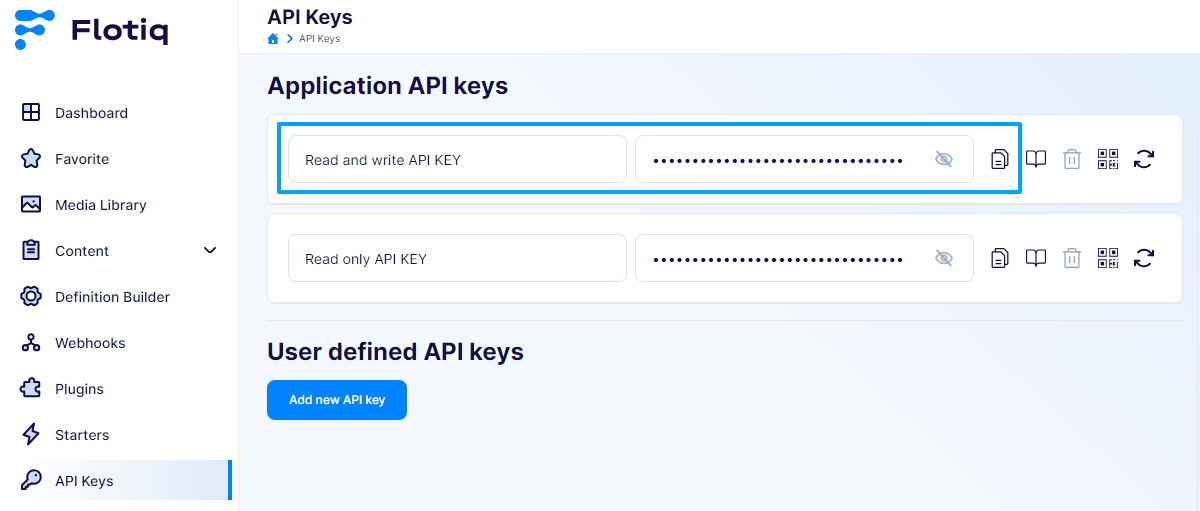
You can generate a key that includes only the necessary elements, e.g., the "Project" Content Type for reading. If the application in the future allows writing, such as comments, you can generate a key with the appropriate permissions.
—
Setting up environment variables
Create a .env.local file and paste the value copied from Flotiq into it.
FLOTIQ_API_KEY=___YOUR_READ_ONLY_API_KEY___Setting up Flotiq SDK
In projects built with TypeScript, we recommend using the personalized Flotiq SDK. It wraps the REST API, providing convenient access to data tailored to your data model, including data types and intelligent code completion.
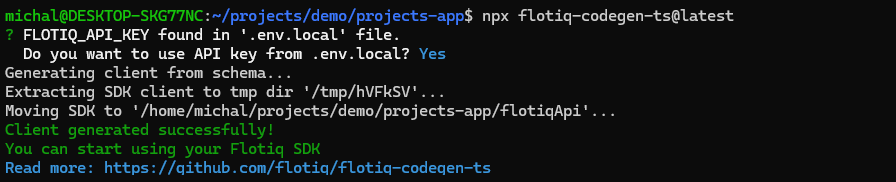
Download the Flotiq SDK for your project:
npx flotiq-codegen-ts@latestExecuting the command will download the SDK based on your Content Type Definitions. Note that the script used the previously pasted key from the .env.local file. A directory named flotiqApi has been created in your application directory.
Remember, when you change the Content Type Definition settings in Flotiq (e.g., add a new type or change a field in an existing one), you need to run the command again: npx flotiq-codegen-ts.
—
Fetch content from Flotiq using Flotiq SDK
Now let's dive into how to use the downloaded SDK. For the sake of organization, we will save the communication logic with Flotiq in a separate file /src/lib/api.ts.
Create a file /src/lib/api.ts where we will place the basic requests needed to complete the project:
import { FlotiqApi, Project, ProjectList } from "../../flotiqApi/src";

type ProjectFilter = {
  slug?: {
    type: string,
    filter: string
  }
}

export async function fetchAllProjects(): Promise<ProjectList> {
  const flotiq = new FlotiqApi(process.env.FLOTIQ_API_KEY);
  const filters: ProjectFilter = {};

  return flotiq.ProjectAPI.list({
    limit: 100,
    filters: JSON.stringify(filters)
  });
}

export async function fetchProjectBySlug(slug: string): Promise<Project | undefined> {
  const flotiq = new FlotiqApi(process.env.FLOTIQ_API_KEY);
  const filters: ProjectFilter = {
    slug: {
      type: 'equals',
      filter: slug,
    }
  };
  const projects = await flotiq.ProjectAPI.list({
    limit: 1,
    filters: JSON.stringify(filters)
  });
  return projects.data?.[0];
}
Note the following:
- Line 10: The fetchAllProjects method retrieves all objects of the Project type.
- Line 20: The fetchProjectBySlug method retrieves a Project object that has a specific value in the slug field.
Notice that in the code, we can use types such as ProjectList or Project, making it more convenient to work with data stored in Flotiq.
Now we are ready to display content from Flotiq.
4. Displaying the list of articles and a single article
We have the data model, test entries, the application skeleton, and a convenient way to connect to Flotiq. Now let's move on to displaying content. In the example application, we will list Projects and allow displaying the details of a single Project.
Listing projects on the application's homepage
1. Prepare app configuration to display images from Flotiq host. Thanks to that, we can utilize the next/image component.
Update the file nextjs.config.ts to containg the following configuration in the images key:
/** @type {import('next').NextConfig} */
const nextConfig = {
    images: {
        remotePatterns: [
            {
                protocol: 'https',
                hostname: 'api.flotiq.com',
                port: '',
                pathname: '/**',
            },
        ],
    },
};

export default nextConfig;
Note: the change may require rerunning the command yarn dev.
2. Replace the example homepage code defined in /app/page.tsx.
import { fetchAllProjects} from "@/lib/api";
import { Project } from "../../flotiqApi/src";
import Image from "next/image";
import Link from "next/link";

export default async function Home() {
  const projects = await fetchAllProjects();

  return (
    <main className="max-w-6xl mx-auto px-4 py-10">
      <h1 className="text-2xl font-bold mb-8 border-b-2 border-gray-600">Our Projects</h1>
      <div className="grid grid-cols-1 md:grid-cols-3 gap-6">
        {
          projects.data?.map((project: Project) => (
            <article key={project.id}>
              <Link href={`/projects/${project.slug}`}>
                <h2 className="text-xl font-semibold mb-2">{project.name}</h2>
                <Image
                  src={`https://api.flotiq.com${project.photos?.[0].url}`}
                  alt={project.name}
                  className="w-full h-auto rounded"
                  width={400}
                  height={300}
                />
              </Link>
            </article>
          ))
        }
      </div>
    </main>
  );
}
Note the following:
- Line 7: const projects = await fetchAllProjects(); - fetching Projects to display, using the previously prepared API.
- Line 10: className="max-w-6xl mx-auto px-4 py-10" - using TailwindCSS classes for basic component styling.
- Line 14: projects.data.map((project: Project) => ( - listing Projects, note that we can use the Project type, which provides attribute suggestions for this object.
- Line 20: {project.name} - displaying an object's attribute, e.g., the name.
Check how your application looks. Go to http://localhost:3000 and see the results. The homepage should look like this:

Displaying a single Project
As you have probably noticed, the homepage contains a list of projects and a Link component that will lead to the page of a single Project. In this step, we will define routing and display the description of a single Project at the /projects/[slug] address.
1. Add the Tailwind @tailwindcss/typography plugin
The content of one of the fields we want to display - the description field - will be in HTML format, generated by a Rich Text Editor. To correctly handle the HTML tags (e.g., h1, h2, <strong>), we need to extend Tailwind with the @tailwindcss/typography plugin. Otherwise, they will not be styled, as Tailwind relies solely on classes, not HTML tags.
Add the plugin:
yarn add @tailwindcss/typographyEnable the plugin in the tailwind.config.ts file:
// ...other tailwind config

plugins: [
  require('@tailwindcss/typography'),
]
2. Create a single project page /app/projects/[slug]/page.tsx.
According to the Dynamic Route convention in NextJS, the page.tsx file placed in the [slug] directory will be responsible for displaying the content of pages where [slug] will be replaced by possible values from the browser address.
Here is the source code for a single project page:
import { fetchAllProjects, fetchProjectBySlug } from "@/lib/api";
import type { Project, ProjectList } from "../../../../flotiqApi/src";
import Image from "next/image";
import { notFound } from "next/navigation";
import Link from "next/link";

export async function generateStaticParams() {
  const allProjects: ProjectList = await fetchAllProjects();
  return allProjects.data?.map((project: Project) => ({
    slug: project.slug,
  })) || [];
}

interface ProjectProps {
  params: {
    slug: string
  };
}

export default async function Project(props: ProjectProps) {
  const project = await fetchProjectBySlug(props.params.slug);

  if (!project) {
    notFound();
  }

  return (
    <main className="max-w-6xl mx-auto px-4 py-10">
      <h1 className="text-2xl font-bold mb-8 border-b-2 border-gray-600">{project.name}</h1>
      <div className="grid grid-cols-2 gap-6">
        <div>
          <Image
            src={`https://api.flotiq.com${project.photos?.[0].url}`}
            alt={project.name}
            className="w-full h-auto rounded"
            width={400}
            height={300}
          />
        </div>
        <div>
          <div
            dangerouslySetInnerHTML={{__html: project.description ?? ''}}
            className="prose prose-invert"
          />
        </div>
        <Link href="/">Back</Link>
      </div>
    </main>
  );
}
Note the following:
- Line 7: The generateStaticParams function is responsible for generating all possible paths based on the slug field.
- Line 21: Using the previously prepared fetchProjectBySlug function to fetch projects from Flotiq.
- Line 43: Using the classes “prose prose-invert”, i.e., className="prose prose-invert", so that the code returned by Flotiq in the description field (Rich Text type) will be correctly styled.
You just need to navigate to the specific project page, in our case http://localhost:3000/projects/smart-home-automation-system to display the finished page:

5. Building a statically generated application
Currently, we have a page with a list of projects and a detailed project page, both optimized for using React Server Components and static rendering. This provides exceptional application speed; however, its content is updated only during the build process.
Create a production-optimized application by running the command:
yarn buildNext, run the application:
yarn startGo to http://localhost:3000/ and see how fast the application runs. What happens, however, when we change the content in Flotiq? With this approach, the page will not update - we must rebuild the project each time using yarn build.
To make our page respond to changes in Flotiq, we will prepare an On-demand Revalidation mechanism.
6. Implementing the on-demand revalidation mechanism
To make our page behave dynamically, responding to events from Flotiq, we will prepare an On-demand Revalidation strategy in two steps:
- Create an API endpoint that, when queried, will clear the cache for specific addresses.
- Create Webhooks in Flotiq that, upon content edit actions, will trigger the cache revalidation API.
Creating the revalidate API in Next.js
Our application will include an additional endpoint, for example, /api/revalidate, which, when queried, will clear the cache within the specified range - for given paths. We will prepare a route handler for this purpose, using the revalidatePath method.
Add a key to the .env.local file that we will use to secure the cache endpoint:
REVALIDATE_KEY=secret_keyCreate file /src/app/api/revalidate/route.ts, in which we will handle /api/revalidate
import { revalidatePath } from 'next/cache'
import { NextRequest } from 'next/server'

export async function POST(request: NextRequest) {
  const providedKey = request.headers.get('x-revalidate-key');
  const path = request.nextUrl.searchParams.get('path') ?? '/'

  if (providedKey !== process.env.REVALIDATE_KEY) {
    return Response.json({ message: 'Invalid revalidate key'}, { status: 401 })
  }

  revalidatePath(path, 'page');

  return Response.json({ path: path, now: Date.now() });
}
Note the following:
- Line 8: Checking whether the correct x-revalidate-key endpoint was entered - it shouldn’t be accessible without security.
- Line 12: Using the function revalidatePath(path, 'page') informing Next.js that the path should be re-fetched the next time it is loaded. The second parameter of the function is used to tell Next.js whether to refresh a specific path, a dynamic path, or a layout. You can read more about using this function in the documentation.
Let's see in practice how the revalidate function works:
- Build the application using the yarn build command
- Start the server using the yarn start command
- Go to https://localhost:3000
- Change the data of a project in Flotiq, eg. change the title.
- Refresh the site https://localhost:3000 - no changes visible.
- Execute the revalidate request for the path "/" (for the homepage): curl --location --request POST 'http://localhost:3000/api/revalidate?path=/' \ --header 'x-revalidate-key: secret_key'
- Refresh the site https//localhost:3000 - changes should be visible now.
- Execute the revalidate request, for the path “/projects/[slug]” curl --location --request POST 'http://localhost:3000/api/revalidate?path=/projects/[slug]' \ --header 'x-revalidate-key: secret_key'
- Changes should also be visible on the project subpages.
We have just used the On-demand revalidation mechanism. Thanks to this, updating the content does not require rebuilding the page, only an additional request to the API.
In the next section, we will automate the process using Flotiq Webhooks.
Creating webhooks in Flotiq
To automate the revalidation process, simply add the appropriate webhooks to Flotiq that will behave like the example CURL requests mentioned in the section above.
To use webhooks, the service must be in a publicly accessible environment. In the examples below, replace the values [APP_PUBLIC_URL] once you publish the service, e.g., on Vercel, as described in the final step of the article.
To use webhooks with a local application (running on localhost), you can also use ngrok to make your local application accessible from the outside.—
We need to add two webhooks that will execute after the change in Content Type Definition Project.
- http://[APP_PUBLIC_URL]/api/revalidate?path=/
- http://[APP_PUBLIC_URL]/api/revalidate?path=/projects/[slug]
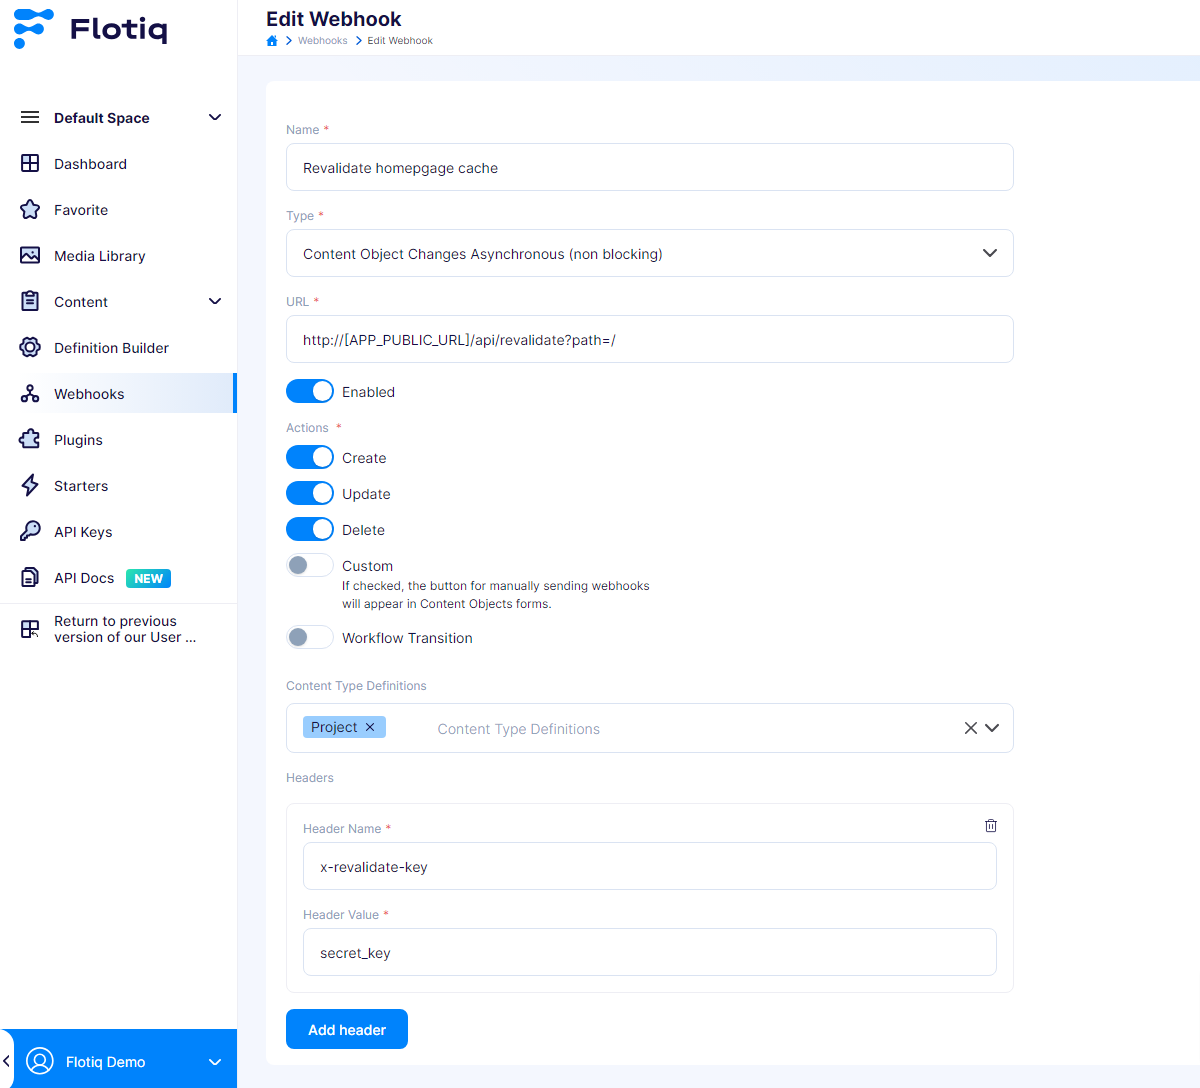
Create the first webhook 'Revalidate homepage cache', providing the following values:
- Type: Content Object Changes Asynchronous
- URL: http://http://[APP_PUBLIC_URL]/api/revalidate?path=/
- Enabled: true
- Actions: Create, Update, Delete
- Content Type Definitions: Projects
- Headers: x-revalidate-key, secret_key (remember that the value of secret_key should match the REVALIDATE_KEY value that we’ve defined in the .env.local file)
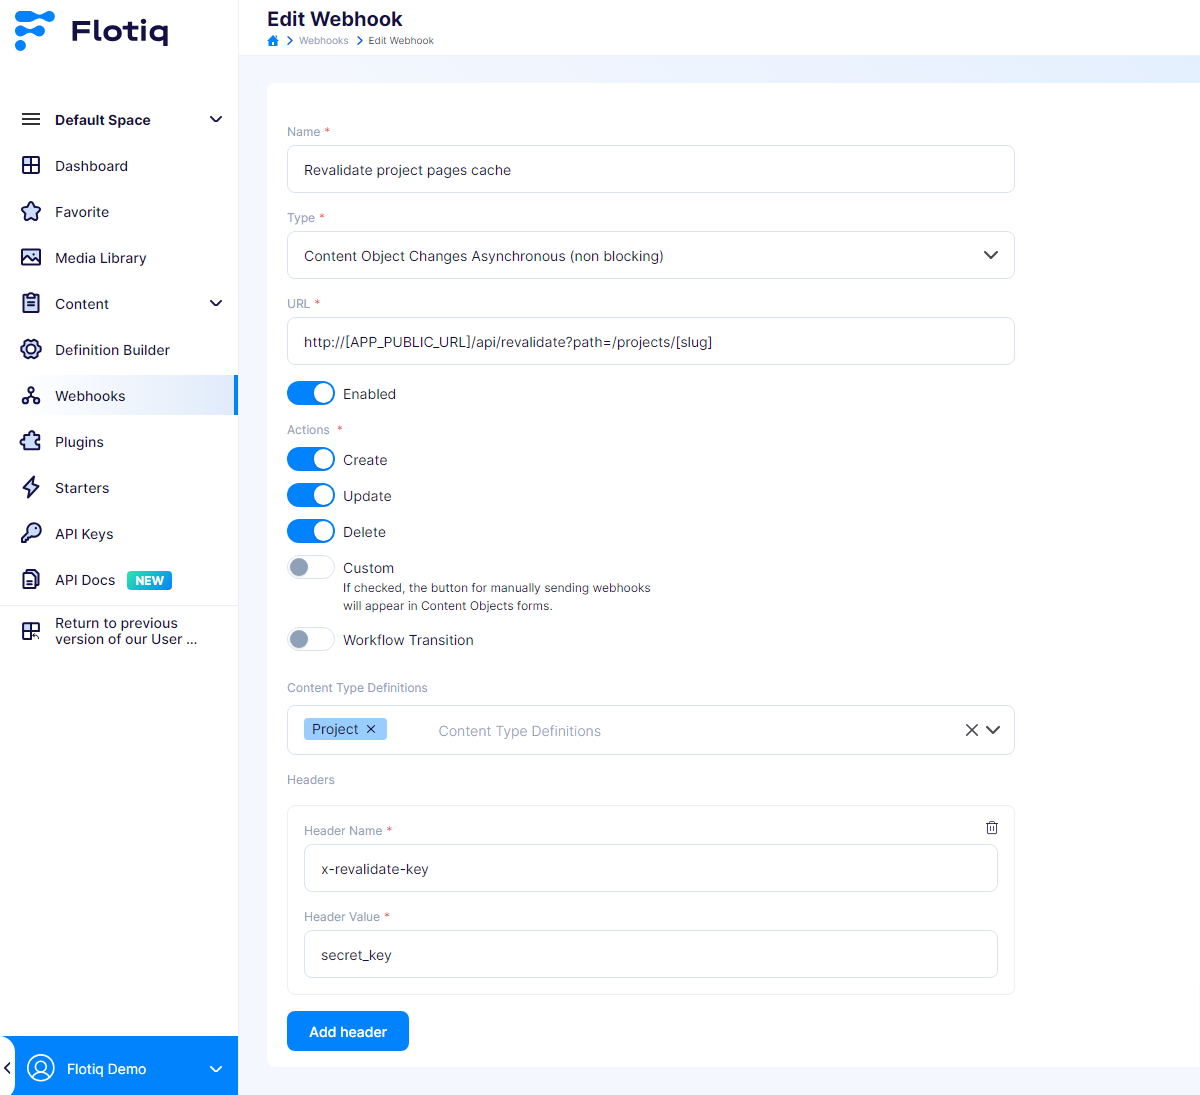
Create another webhook ‘Revalidate project pages cache’, providing the following values:
- Type: Content Object Changes Asynchronous
- URL: http://[APP_PUBLIC_URL]/api/revalidate?path=/projects/[slug]
- Enabled: true
- Actions: Create, Update, Delete
- Content Type Definitions: Projects
- Headers: x-revalidate-key, secret_key (remember that the value of secret_key should match the REVALIDATE_KEY value that we’ve defined in the .env.local file)
Summing up, our webhook list should look like this:

To make sure that a given webhook works, you can check its execution log available in the webhook’s edit view.
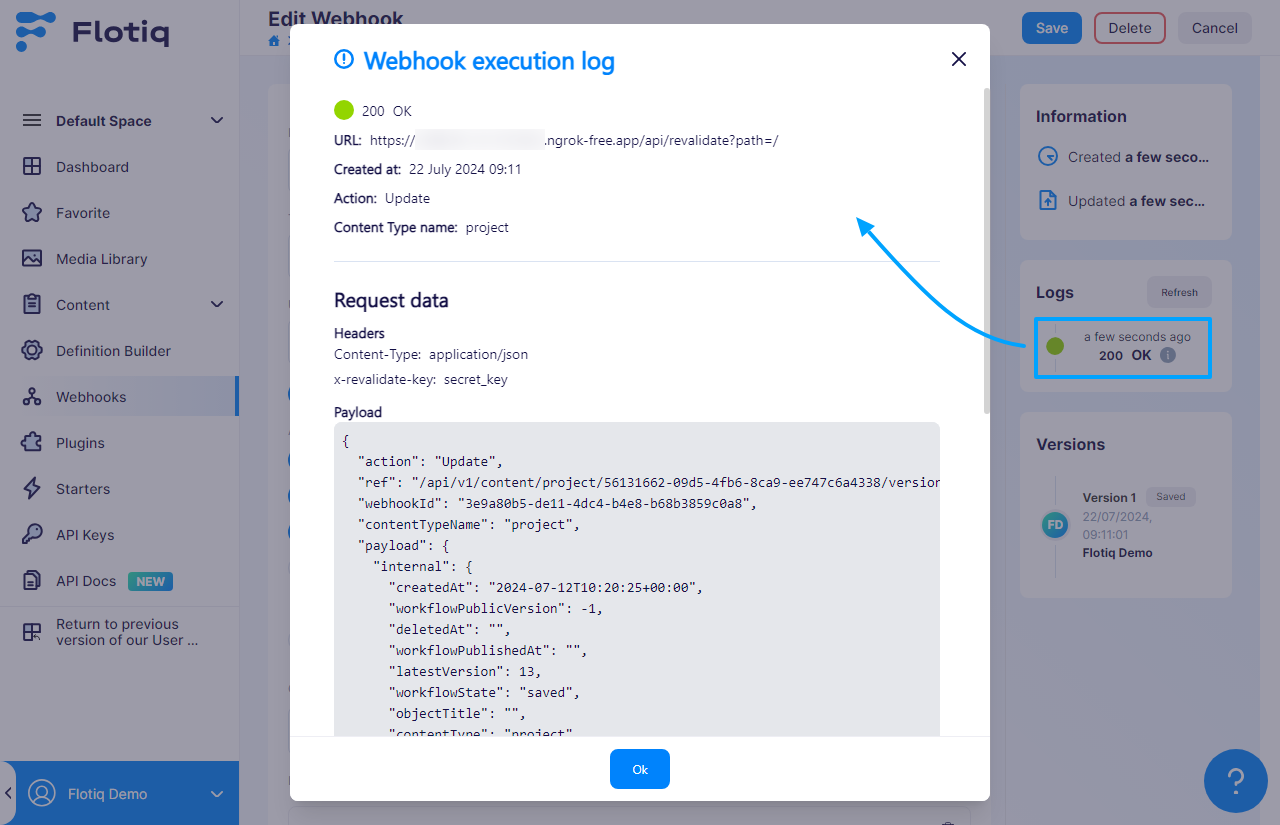
Remember, for the webhook to execute, your application must be accessible from the outside. This requires either publishing the application or using services like ngrok.
—
Our Next.js application reacts to changes in objects within Flotiq. This ensures that the content fetched from Flotiq, despite using static generation for performance optimization, will always be up-to-date.
In the next stage, we will use another important feature of Next.js - draft mode.
7. Implementing Next.js
You probably noticed that our Content Type Definition "Project" has a "Status" field, which can be set to "Draft" or "Public". However, we haven't used this field anywhere before.
Our intention is to allow Content Editors to work on content without publishing it. Hence the need to mark some content as "Draft".
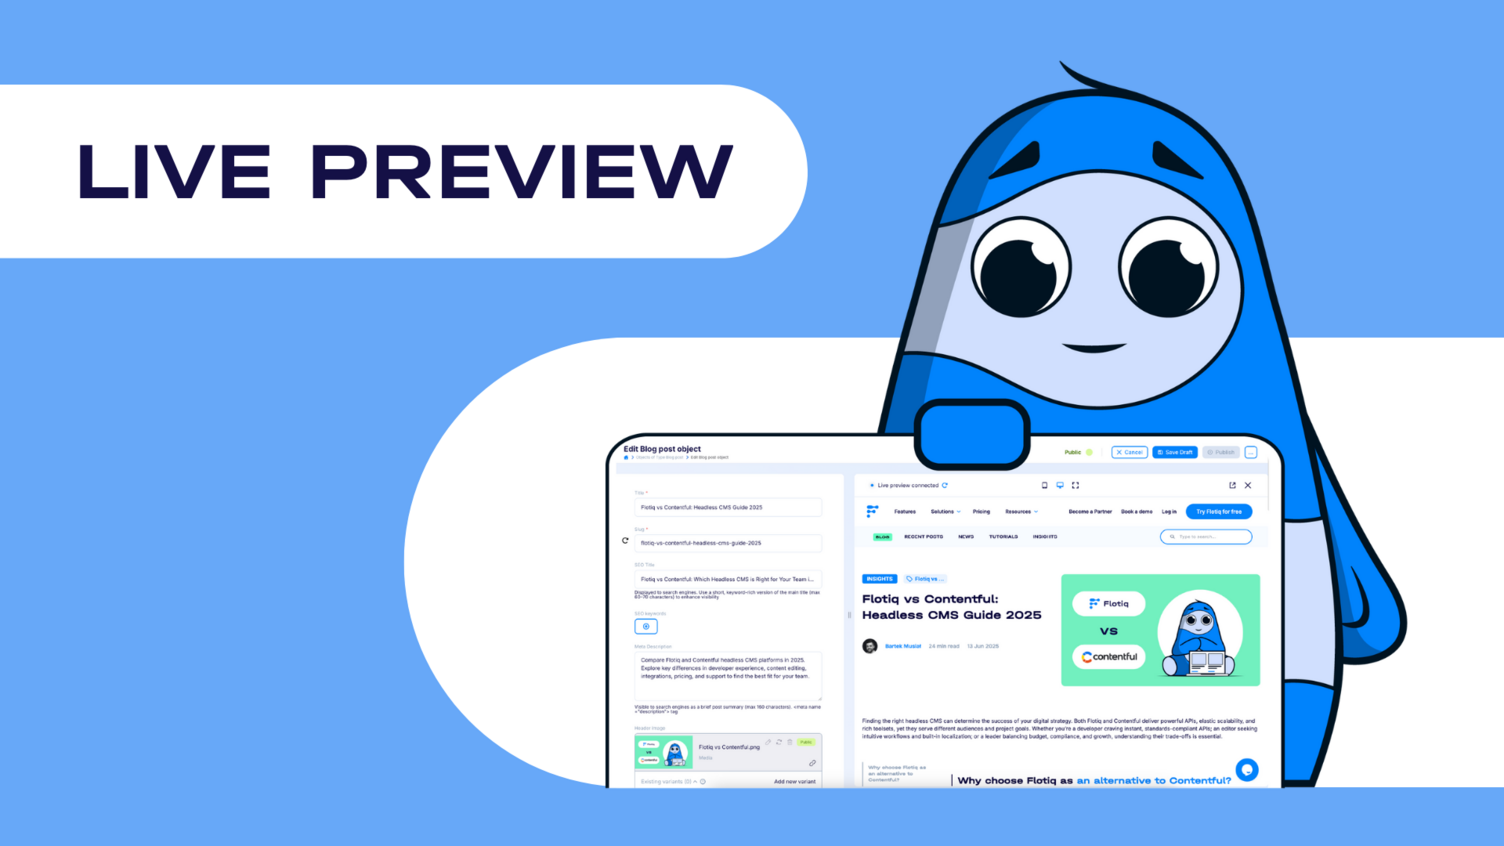
The result of this step will be the extension of Flotiq with a "Preview page" button, allowing the preview of pages with draft status. The application in this mode will be generated dynamically, enabling real-time tracking of changes.
Updating the project for Draft Mode
We will extend our templates to support Draft Mode, and requests to Flotiq will include the appropriate filters indicating the status in which to display the data.
1. Add an environment variable to the .env.local file, which will be used to secure the preview mode endpoint:
DRAFT_MODE_KEY=secret_key2. Add Draft Mode information to the homepage template. Thanks to this, the application will know in which mode it is operating.
// src/app/page.tsx

import { draftMode } from "next/headers";
// ...

export default async function Home()
  const { isEnabled } = draftMode();
  const projects = await fetchAllProjects(isEnabled);
  // the rest of current file
Note that we pass the isEnabled information to our function fetchAllProjects.
3. Similarly, add Draft Mode information to the project page template.
// src/app/projects/[slug]/page.tsx

import { draftMode } from "next/headers";
// ...

export default async function Project(props: ProjectProps) {
  const { isEnabled } = draftMode();
  const project = await fetchProjectBySlug(props.params.slug, isEnabled);
  // the rest of current file
4. Let's extend the methods in our src/lib/api.ts file responsible for communicating with Flotiq. Replace the file with the one containing the handling of the draftMode parameter.
// src/lib/api.ts

import { FlotiqApi, Project, ProjectList } from "../../flotiqApi/src";

type ProjectFilter = {
  slug?: {
    type: string,
    filter: string
  },
  // Added status filter type
  status?: {
    type: string,
    filter: "draft"|"public"
  }
}

export async function fetchAllProjects(draftMode?: boolean): Promise<ProjectList> {
  const flotiq = new FlotiqApi(process.env.FLOTIQ_API_KEY)
  const filters: ProjectFilter = {};

  // Added filter status = public, if not in draft mode
  if(!draftMode) {
    filters.status = {
      type: 'equals',
      filter: 'public'
    }
  }

  return flotiq.ProjectAPI.list({
    limit: 100,
    filters: JSON.stringify(filters)
  })
}

export async function fetchProjectBySlug(slug: string, draftMode?: boolean): Promise<Project | undefined> {
  const flotiq = new FlotiqApi(process.env.FLOTIQ_API_KEY);
  const filters: ProjectFilter = {
    slug: {
      type: 'equals',
      filter: slug,
    }
  }

  // Added filter status = public, if not in draft mode
  if (!draftMode) {
    filters.status = {
      type: 'equals',
      filter: 'public'
    }
  }

  const projects = await flotiq.ProjectAPI.list({
    limit: 1,
    filters: JSON.stringify(filters)
  });
  return projects.data?.[0];
}
Note the following:
- Line 22: Extending the ProjectFilter type with a new attribute: status.
- Lines 22 and 45: Conditionally adding the filters.status filter when we are outside of Draft Mode. This means that when we are not using Draft Mode, we only display content with the status “public”.
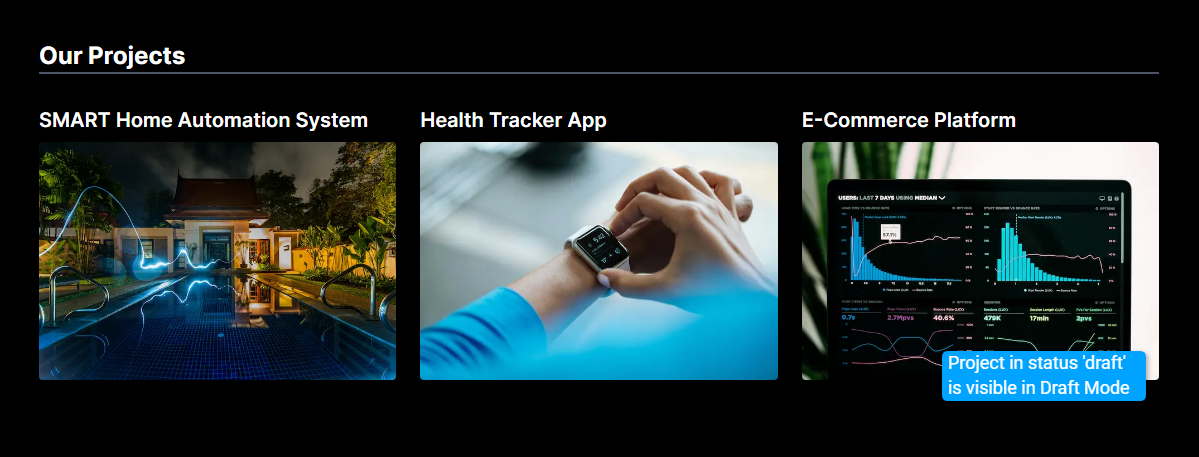
Note that on the project’s homepage, at http://localhost:3000, only projects marked with the "public" flag in Flotiq are visible.
Now, we will add an API endpoint to instruct the application to also show content with draft status.
Creating Draft Mode API in Next.js
Add a handler to process the path /api/draft?slug=/&key=secret_key. In accordance with the Next.js convention, place it in the /app/api/draft/route.ts file:
import { draftMode } from 'next/headers';
import { redirect } from 'next/navigation';

export async function GET(request: Request) {
  const { searchParams } = new URL(request.url)
  const secret = searchParams.get('secret');
  const disable = searchParams.get('disable');
  const slug = searchParams.get('slug') ?? '/';

  // Turn on draft mode
  if (!disable) {
    if (!secret || secret !== process.env.DRAFT_MODE_KEY) {
      return new Response("Missing or invalid secret", { status: 401 });
    }
    draftMode().enable();
    redirect(slug);
  }

  // Turn off draft mode
  draftMode().disable();
  redirect(slug);
}
Note the following:
- Line 11: We handle enabling and disabling draft mode. When enabling Draft Mode, for security reasons, we require the use of the DRAFT_MODE_KEY token.
- Line 15: Enabling draft mode using the built-in Next.js function.
- Linia 20: Disabling draft mode using the built-in Next.js function.
Draft Mode handling is ready! By navigating to http://localhost:3000/api/draft?secret=secret_key, you should see all posts on the homepage, including those with the draft status.
In the next step, we will propose a minor improvement to make using Draft Mode easier.
Creating a component to indicate if the page is in Draft Mode
To improve Draft Mode on the application side, we can add a component informing you that you are in draft mode. Additionally, we will add a link to conveniently exit preview mode.
To add the DraftModeToolbar component, add the src/app/ui/DraftModeToolbar.tsx file.
'use client'

import { usePathname } from "next/navigation";

export default function DraftModeToolbar() {
  const pathName = usePathname();

  return (
    <div className="fixed top-0 right-0 py-2 px-4 bg-red-500">
      <p>Draft mode enabled</p>
      <a href={`/api/draft/?disable=true&slug=${pathName}`}>Disable</a>
    </div>
  )
}
Note the following:
- Line 1: Add the "use client" directive, informing Next.js that the following code will execute on the client side. We need this to use the usePathname() hook, which returns the current URL.
- Line 11:Link to exit Draft Mode, referring to the previously defined API.
We will use this component in the project layout, in the src/app/layout.tsx file.
// src/app/layout.tsx
// ...
import { draftMode } from "next/headers";
import DraftModeToolbar from "@/app/ui/DraftModeToolbar";
// ...

export default function RootLayout({children}: Readonly<{children: React.ReactNode;}>) {
  const { isEnabled } = draftMode();
  return (
    <html lang="en">
      <body className={inter.className}>
        { isEnabled && <DraftModeToolbar/> }
        { children }
      </body>
    </html>
  );
}
Note the following:
- Line 8: Fetching information on whether Draft Mode in enabled.
- Line 12: When Draft Mode is enabled, display DraftModeToolbar.
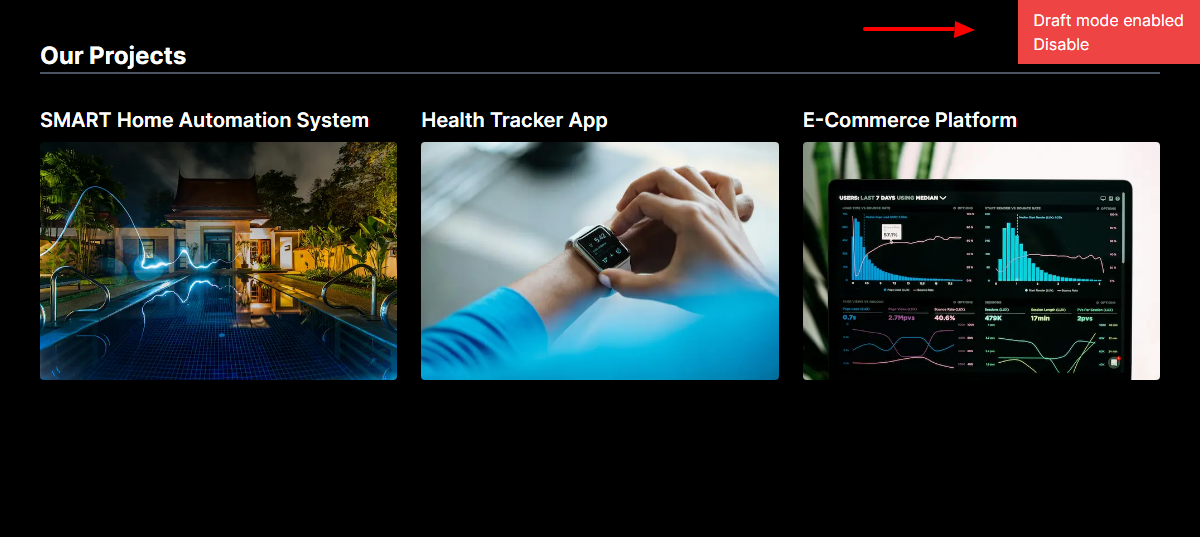
After these changes, when you are in Draft Mode, you will see a convenient notification with a link to exit Draft Mode in the top right corner of the application.
The final step is to integrate the Flotiq interface with Draft Mode.
Creating a preview link in Flotiq
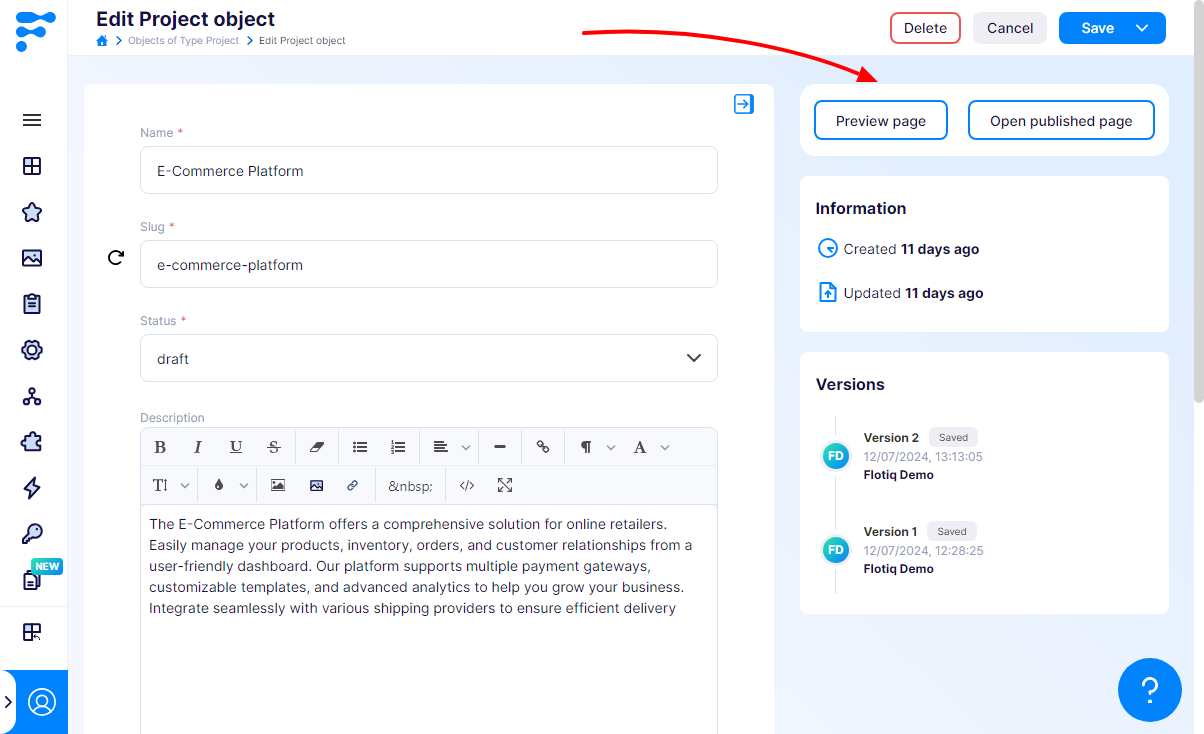
To make working in Flotiq even more convenient, we will extend Flotiq with additional buttons to open the project preview. Here is what your project editing form will look like:
1. In your Flotiq account, add the “Custom Links” plugin.

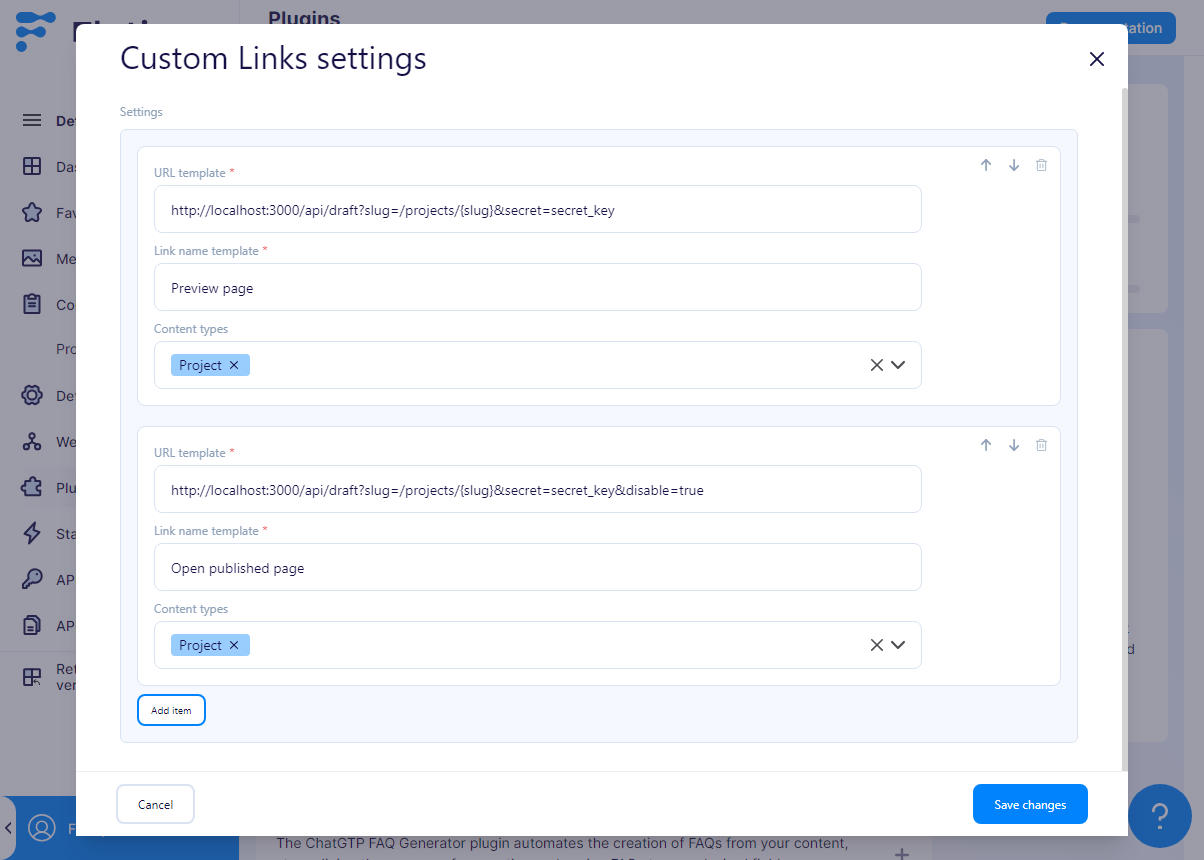
2. Configure the plugin to display the “Preview page” and “Open published page” buttons. Click “Manage” on the plugin list and fill it out with the following values.
Preview page:
- URL Template: http://localhost:3000/api/draft?slug=/projects/{slug}&secret=secret_key
- Link name template: Preview page
- Content types: Project
Open published page:
- URL Template http://localhost:3000/api/draft?slug=/projects/{slug}&secret=secret_key&disable=true
- Link name template: Open published page
- Content types: Project
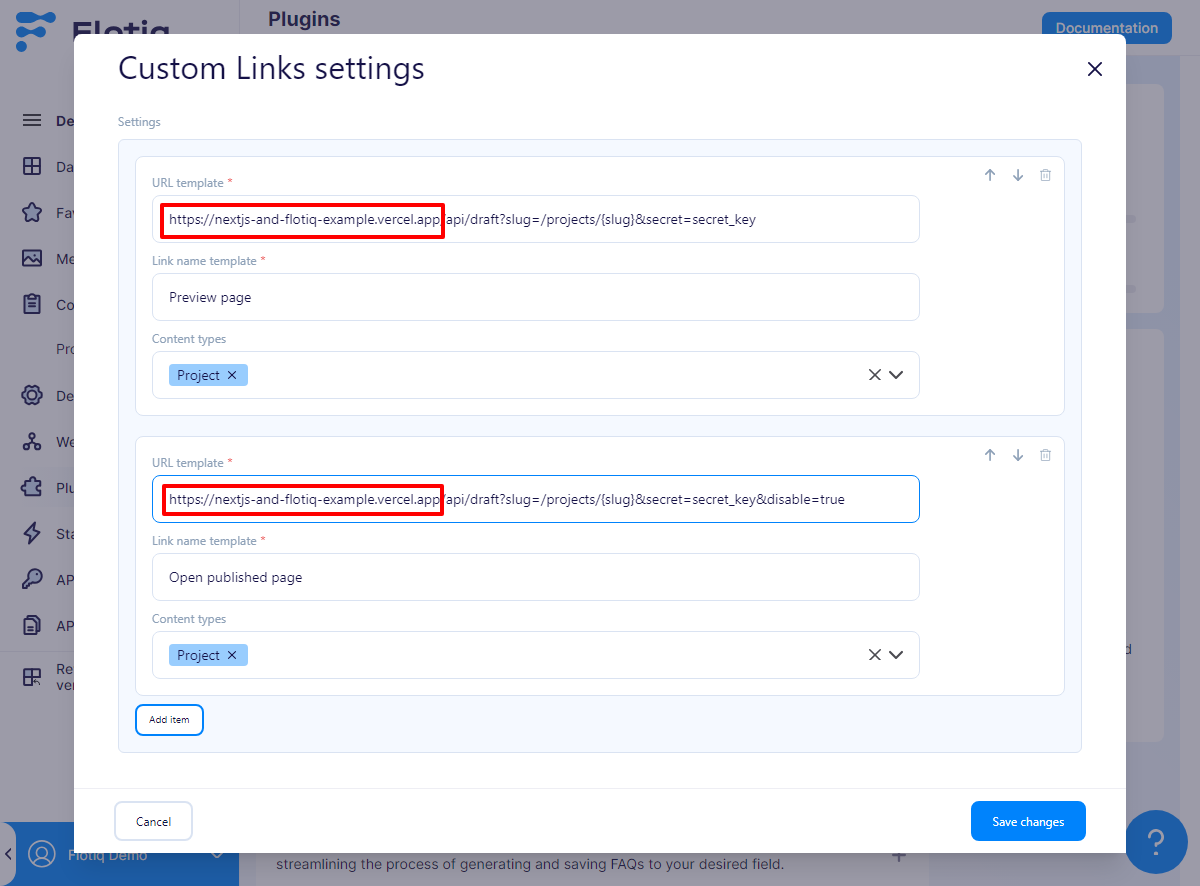
Here’s what the configuration should look like:
This way, we’ve extended the Flotiq interface. Check how the buttons behave in the project editing view. Remember, if you change the application's address, add new buttons or update the button URLs.
Congratulations! We’ve created a complete application - from the template, through fetching content from Flotiq, using cache, and up to Draft Mode. Now it's time to share it with the world. In the final step, we will describe deployment to the Vercel platform.
8. Go live! Deployment to Vercel
Vercel is an excellent choice for deploying a Next.js application for several reasons: native integration with Next.js, simple configuration, a global CDN network ensuring fast page loading, support for serverless functions, automatic SSL, and easy domain management.
The deployment process is intuitive: connect your repository from GitHub, GitLab, or Bitbucket, and Vercel will automatically build the application after each push.
Publishing repository to GitHub
To start working with Vercel, it is most convenient to create a repository on GitHub, Bitbucket, or GitLab. In our article, we will use the first one (GitHub).
Create a GitHub repository and upload the project files:
git add .
git commit -m "Next.js with Flotiq - example app"
git remote add origin https://github.com/[user]/[repository].git
git push origin main
Importing git repository to a Vercel project
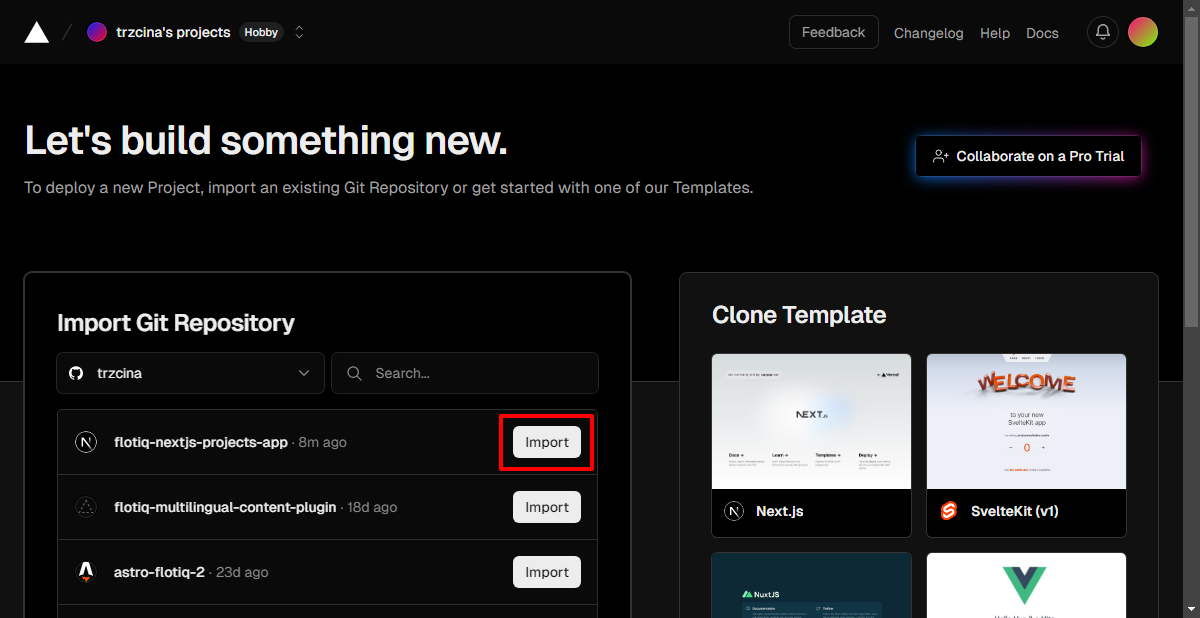
Next, create a Vercel account or log in to an existing account. Select importing the repository from GitHub, choosing your account and the repository with the Next.js project.
After entering the configuration view, don’t forget to enter the environment variables corresponding to those in your .env.local file.
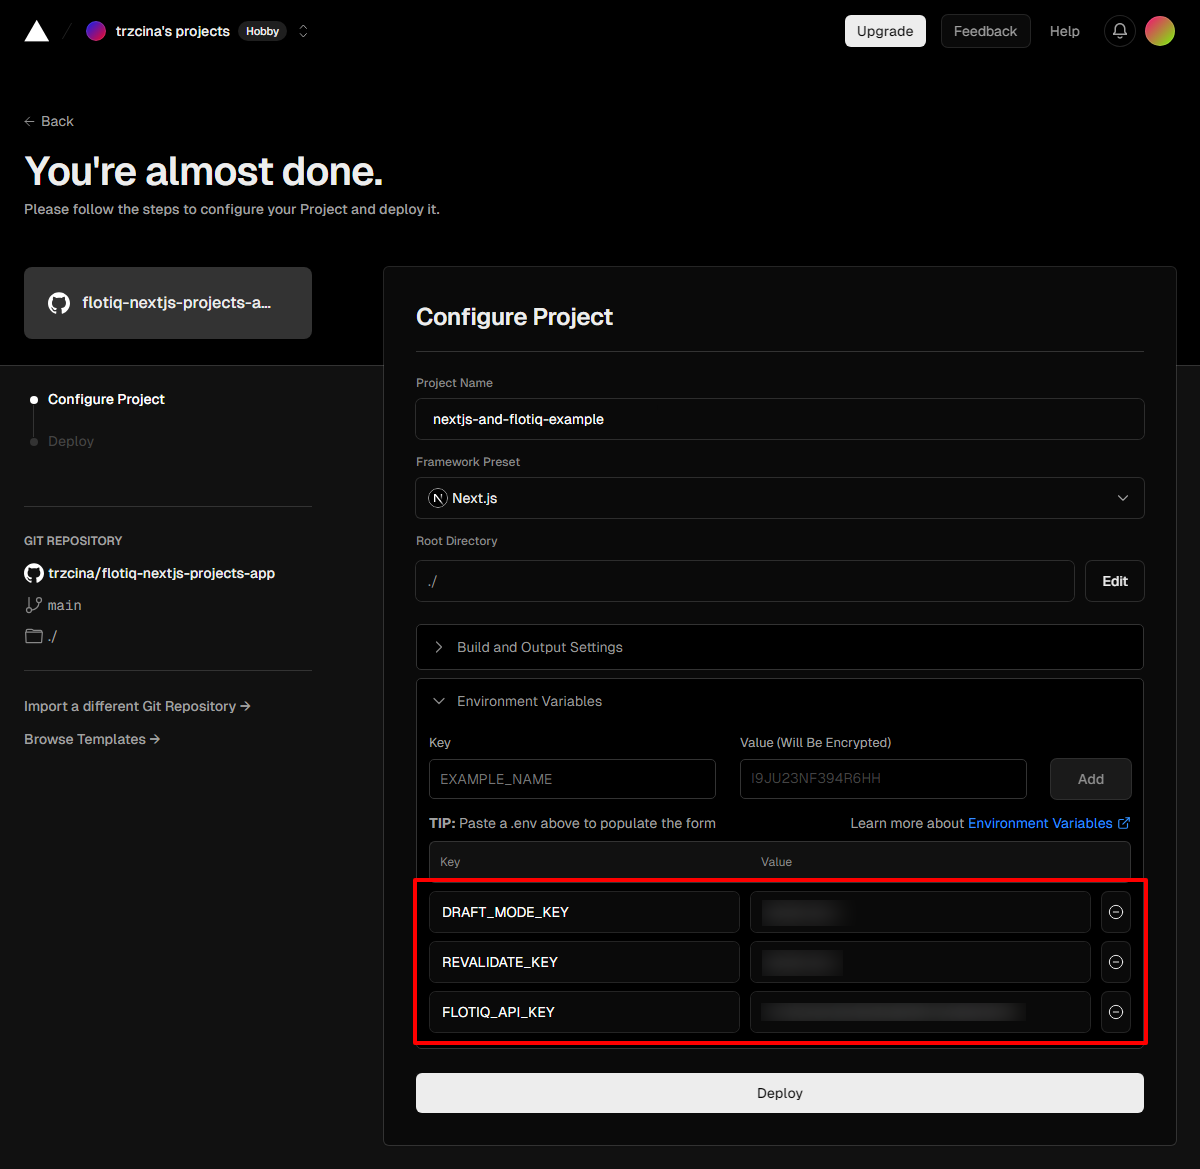
Deploy
Click the “Deploy” button. The operation may take a few minutes.
Once the build process is complete, the site will be available, and you can find its address on the Vercel dashboard.
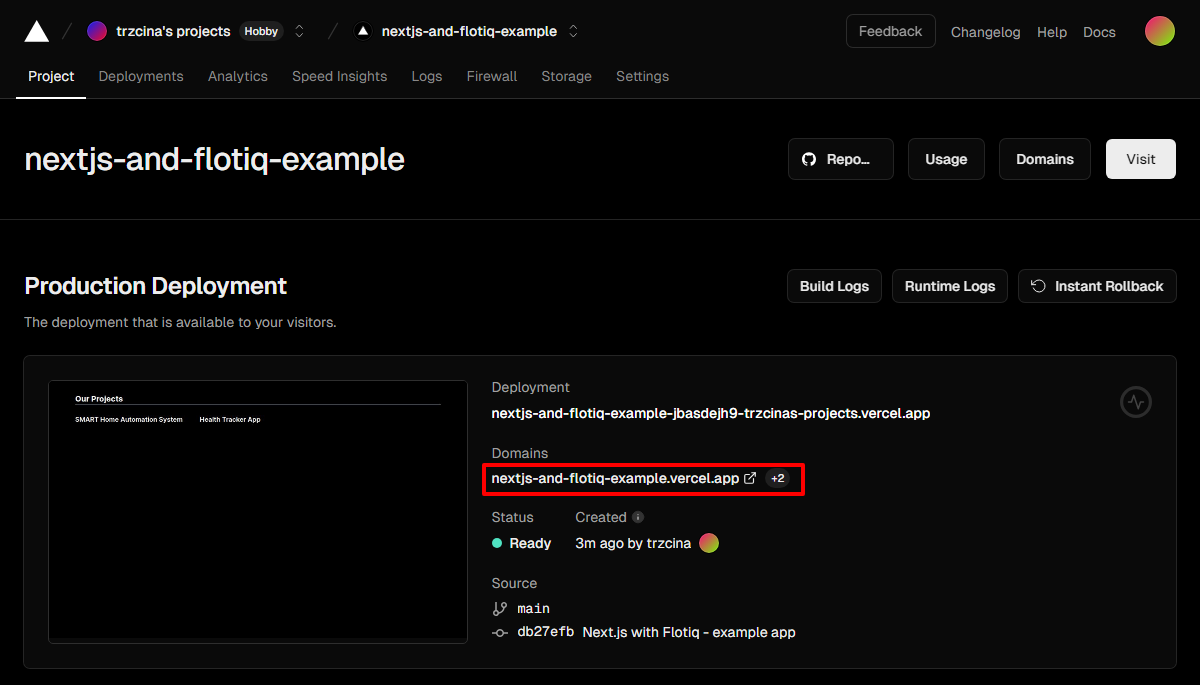
From now on, the site is available to the public.
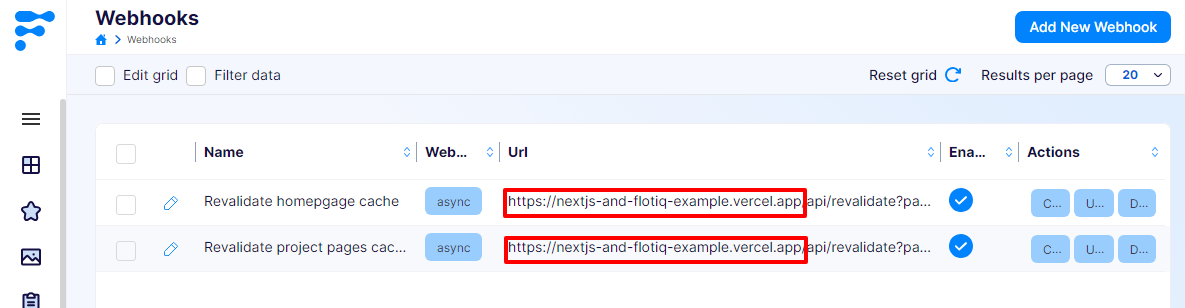
Update webhooks and custom links in Flotiq
The final step will be to update the addresses of webhooks and links in Flotiq. They should include the domain set on Vercel. For webhooks, replace the previous placeholders APP_PUBLIC_URL with the actual values.
For plugins, replace the previous http://localhost:3000 with the domain set on Vercel.
Summary
In this article, we discussed the steps needed to create a Next.js application connected to Flotiq. We presented how to fetch data using a personalized SDK, configure caching, and use draft mode to preview changes. Finally, we deployed the application on the Vercel platform.
The components used—SDKs, webhooks, and plugins—demonstrate how to conveniently utilize Flotiq and adapt it to various types of projects.
The code for the application prepared for the article is available in a public GitHub repository.